# ETL
library(tidyverse)
library(readxl)
library(writexl)6 Upload and write data
As usual, let’s start by uploading the needed libraries. The usual tidyverse, and also 2 libraries related to excel, to read and write excel files : readxl and writexl.
In this part, we are going to see :
how to upload a csv file or an excel file.
how to write a csv file or an excel file.
how to delete some objects from RStudio.
For this, we will continue introducing some first functions, such as :
read_excel(): to upload an excel file.read_csv(): to upload a csv file.write_xlsx(): to write an excel file.write.csv(): to write a csv file.
7 Upload a data frame
7.1 Using excel
We will use a library called readxl .
Use the RStudio IDE and upload the excel file you want to use, as below:
File => Import Dataset => From Excel
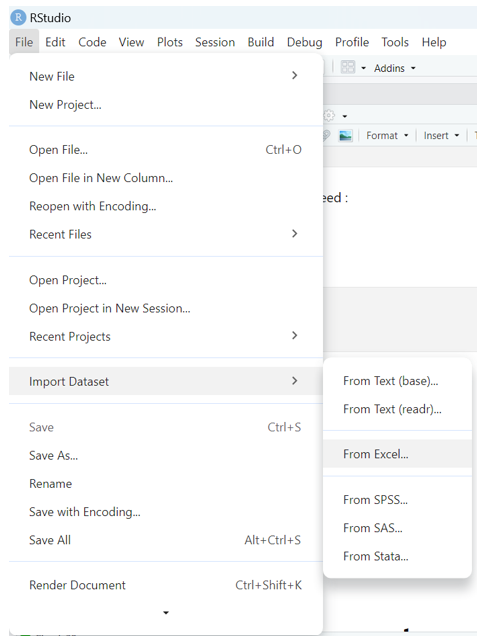
This will open a window where you can browse the file you want to upload.
Or just use the syntax below, using the function read_excel() :
my_data <- read_excel("folder/my_data.xlsx")Using the written code and related path is very convenient, and it will allow us to upload several datasets within our R script, and automate your data processing.
7.2 Using a csv file
We will use a library called readr , which is part of the tidyverse package by default.
Use the RStudio IDE to locate the csv file you need : File => Import Dataset => From Text (readr)
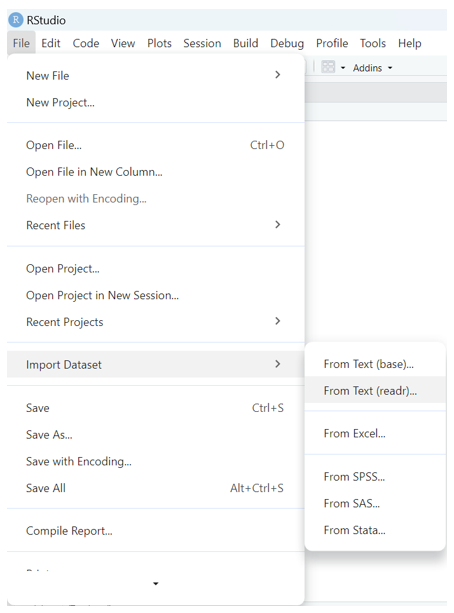
This will open a window where you can browse the file you want to upload.
Or similarly, you can just use the syntax below, using the function read_csv() :
my_data <- read_csv("folder/my_data.csv")8 Write a data frame
The purpose of the ETL (Extract Transform Load) action, is to upload some data, transform them, and then write the results (one or several datasets) in some chosen locations.
We previously uploaded some datasets, now we are going to see how to write the results of our data processing, in 2 popular formats : excel and csv files.
8.1 As an excel file
We need to use the library writexl, and its function write_xlsx() :
write_xlsx(fiscal_calendar_data,
           "fiscal_calendar_data.xlsx")
8.2 As a csv file
From the library readr, we use the function write.csv() :
# write in your documents by default
write.csv(fiscal_calendar_data,
          file = "fiscal_calendar_data.csv")

# write in another folder
write.csv(fiscal_calendar_data,
          file = "~\\Folder Name\\fiscal_calendar_data.csv")
Note that when we write a file, we get a first column with the row names (i.e. their numbers).
If we don’t want them, we can add the syntax below : row.names = FALSE .
write.csv(fiscal_calendar_data,
          file = "fiscal_calendar_data.csv",
          row.names = FALSE)
9 Clean the environment
You created several objects in your environment and you want to delete some of them? Here are 2 ways to do this.
9.1 Broom to delete all
Using the RStudio IDE, you can click on the broom icon to remove all the objects :
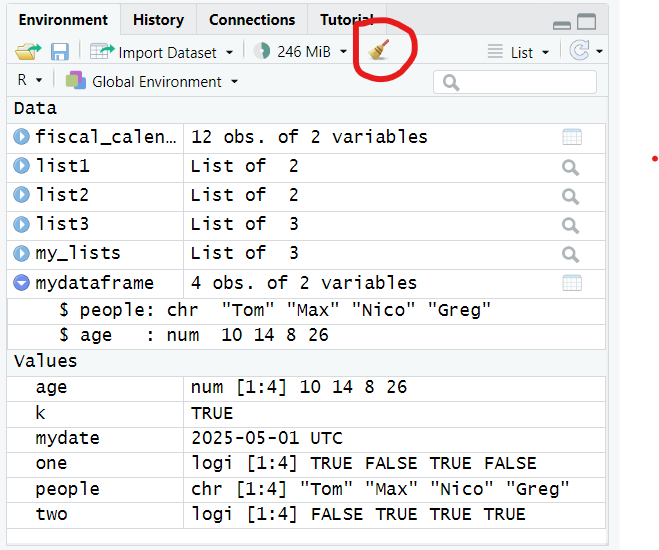
9.2 Delete a specific object
You also can use the rm() function to remove a specific object :
rm(fiscal_calendar_data)Now the object fiscal_calendar_data has disappeared from our environment. It doesn’t appear anymore on the top right of the RStudio IDE.
We’re ready to start the data frame manipulations parts ! :)